Let's face it: electrical problems in your Ford 2000 tractor can be incredibly frustrating. This guide will equip you with the knowledge and step-by-step instructions to diagnose and solve these issues effectively, whether you're a seasoned mechanic or a weekend warrior. Mastering your tractor's wiring diagram is key to preventing costly repairs and keeping your Ford 2000 running smoothly. For a helpful parts manual, check out this Ford 2000 parts manual.
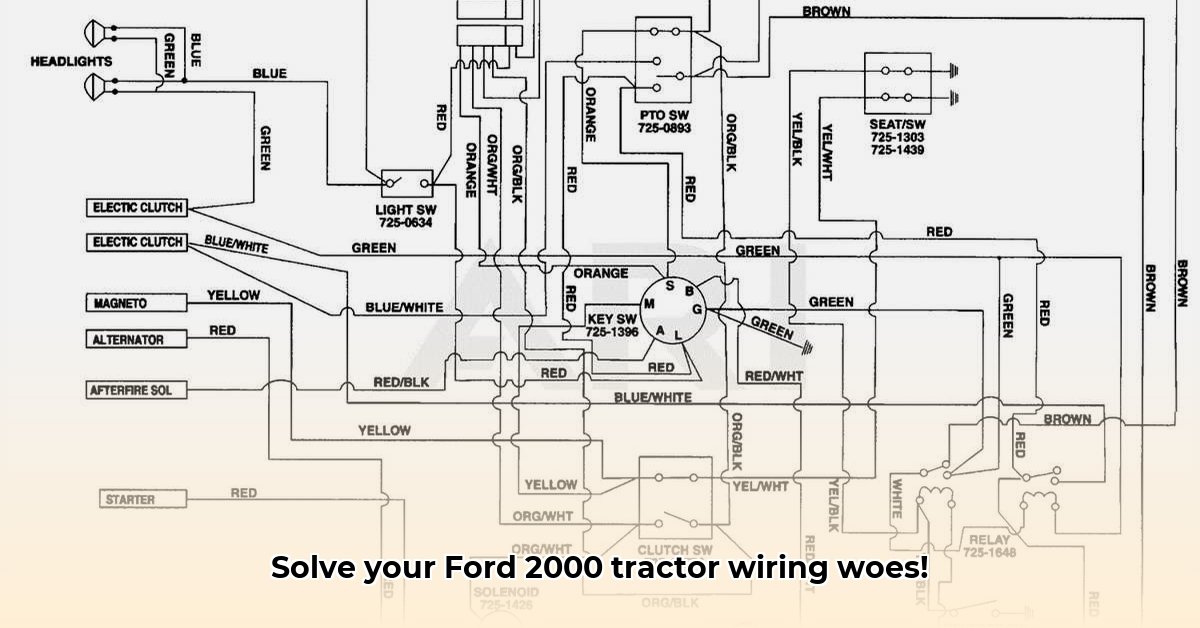
Locating Your Ford 2000 Tractor Wiring Diagram
Before you begin troubleshooting, you need the wiring diagram itself. This serves as your roadmap to the tractor's electrical system. Your first stop should be your owner's manual; the diagram is often included within its pages. If it's missing, don't despair. Many online parts suppliers offer downloadable wiring diagrams, and dedicated Ford tractor forums are excellent resources where other owners might share scanned copies. Online retailers specializing in Ford parts are also worth checking.
Deciphering the Diagram: Understanding the Symbols
Wiring diagrams use symbols and codes which might initially appear confusing. However, understanding these is crucial. Each diagram includes a legend – essentially a key that translates the symbols into the actual components of your tractor. Begin by familiarizing yourself with this legend, learning to correlate the lines and symbols on the diagram to the real-world parts. Concentrate first on the primary circuits: starting, lighting, and ignition. Grasping these will make understanding more complex circuits easier subsequently. It's a skill that develops with practice!
Common Problems and Step-by-Step Solutions
This section details common electrical issues and provides structured solutions using your wiring diagram. Remember, safety is paramount; always disconnect the negative battery terminal before working on any electrical component.
Problem 1: My Tractor Won't Start!
A common issue. Follow these steps:
Battery Voltage Check: Use a multimeter (a must-have tool for electrical troubleshooting) to measure the battery voltage. A low reading indicates the need for a charge or replacement.
Starter Circuit Examination: Consult your diagram to trace the starter circuit. Carefully inspect each connection for loose wires, corrosion, or damage.
Solenoid Testing: Locate the starter solenoid (the diagram will show its location). Use your multimeter to test its functionality; a malfunctioning solenoid can prevent starting.
Ignition Switch Investigation: If steps 1-3 yield no results, the ignition switch might be at fault and require replacement.
Problem 2: Lights Out!
Headlights, taillights—if they're not working, follow this process:
Fuse Check: Your wiring diagram shows the fuse box location. Check all relevant fuses; a blown fuse is a quick and easy fix.
Lighting Circuit Tracing: Locate this circuit in your diagram and carefully inspect each wire and connection for breaks, loose connections, or corrosion.
Bulb Check: A simple burned-out bulb is sometimes the cause.
Problem 3: Dashboard Gauge Malfunction
Wiring Location: Your diagram pinpoints the instrument cluster wiring.
Connection Inspection: Scrutinize all connections within the instrument cluster for loose wires or corrosion.
Voltage and Ground Checks: Verify a stable voltage supply and a secure ground connection at the instrument panel.
Preventative Measures: Proactive Maintenance
Regular maintenance is crucial for preventing electrical issues:
Visual Inspections: Regularly check the wiring harness, paying attention to areas prone to moisture or movement. Look for damage, corrosion, or loose connections.
Connection Cleaning: Clean and tighten all connections periodically using a wire brush and electrical contact cleaner. Corrosion significantly weakens electrical conductivity.
Harness Protection: Consider adding protective sleeving to exposed wiring harnesses to safeguard them against abrasion and vibration.
Safety Precautions: Working with Electricity
Disconnect the Battery: Always disconnect the negative battery terminal before any electrical work.
Eye Protection: Wear safety glasses.
Fire Extinguisher: Keep a fire extinguisher nearby.
Seek Professional Help: If unsure, consult a qualified mechanic.
Additional Support: Resources for Further Assistance
| Resource Type | Description |
|---|---|
| Online Tractor Forums | Connect with other Ford 2000 owners and tap into collective knowledge. |
| Ford Tractor Repair Manuals | Provide detailed information on electrical systems and other components. |
| Local Mechanics | Experienced mechanics can diagnose and repair complex electrical problems. |
This comprehensive guide provides the actionable steps needed to effectively troubleshoot electrical problems in your Ford 2000 tractor. By combining a methodical approach with a thorough understanding of your wiring diagram, you can resolve most issues and keep your tractor running efficiently. Remember, safety always comes first!